Showing posts with label Tutorial. Show all posts

Saturday, October 24, 2015

Fall Fun - Fall inspired Leaf Ring dish made with Polymer Clay

Autumn, the season of Colors, and the season takes leaves from the trees..
Today I have combined both fall colors and leaves in my this project. Such a fun and awesome decor for the beautiful season. I have made this cute Leaf shaped Ring dish but this dish can be used in many ways! Creativity is endless.

DIY - Leaf Ring Dish


Materials and tools
Polymer Clay  - Preferred in Dark Color
Leaf - Larger the batter, Hurry before they all gone
Polymer clay Roller
Craft knife
Pearl-ex pigment - I am using Antique Gold
A good work surface - Flat and scratch proof, Gosh.. we are using knife here..
A small bowl - must be Oven safe
Over - For baking

All set??? So.. Lets begin..
Step 1
Roll the clay, it should bigger than the leaf's size, also I would recommend it thicker than usual.


Step 2

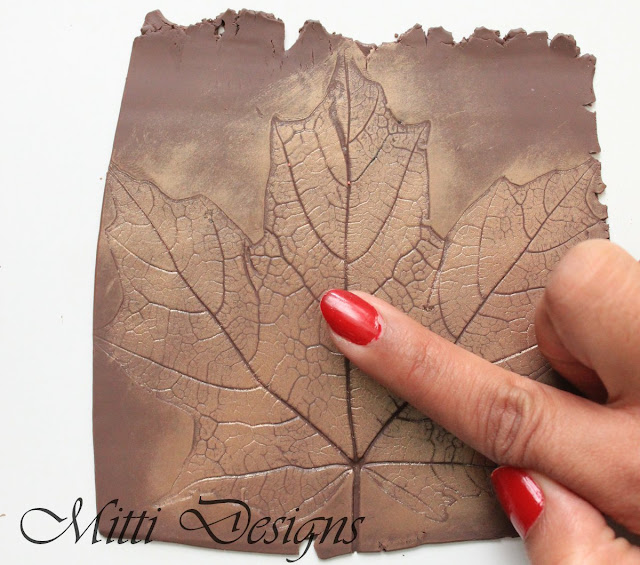
Place leaf and roll once again, with little pressure. We want leave's impression on the clay.

Step 3
Carefully remove leaf. Now its time for color. you can involve kids in this process too.. Take pearl-ex and cover entire leaf with it.. 


Step 4
 Now carefully remove extra clay using craft knife.


The final leaf, gorgeous piece of art!! ready to be shaped..


Step 5

Take leaf from the surface and place it on the up-side down bowl. I have used my clay knife to carefully lift it from the surface.


Step 6

Take the bowl as- it -is and put it in oven for baking. Bake accordingly to the direction written on the clay package. And your leaf bowl is ready!!!!

**** I was not happy with my this white bowl, as I wanted a shallow Dish, so I used a different one. You can also make some adjustments as per your requirements.***

Final Leaf dish -

I hope you like this simple and decorative project.
LEave comments if you like my work, and do share your project when you made it at my facebook page, Mitti Designs

Stay connected <3

Monday, June 15, 2015

Tutorial - Create beautiful Polymer clay Flower Bud beads

Hello my dear lovelies!!!
Today I am back with another tutorial to create Beautiful Lotus Bud beads.


Remember my previous Vishnu Avtar Necklace, where I have made Lotus beads?
With this is tutorial you'll know the technique behind creating perfect Flower bud beads.


For this you need you have your polymer clay Petal Cane ready! I'll make another tutorial for polymer clay cane soon, but first, how to create Beads...


Tuesday, February 17, 2015

Embroidery on clay Tutorial / time lapse Video

Hello my dear lovelies..

Here I am with my another tutorial / A time lapse video on polymer clay embroidery technique.
The detailed visual instructions to create this beautiful flower stud earrings.


I am already fallen in love with this technique, you know that.. 
Many of you asked me how I make things just with a needle.. Well, I hope through this video you'll get all the answers. 


Here are some of the examples / previous earrings made with the same technique.


Let me know how you like this video, and if you made something using this technique, do share with me, in the comment box or send me an e-mail.

Take care..


Tuesday, September 16, 2014

How to take professional looking Jewelry or Product photo - DIY - Photo-box

If you are selling your products on-line, its pretty obvious that you have to take good pictures of your products, if you want to stay in the race.

Professional looking pictures are the key thing to attract many visitors and buyers.
If you can take a good, a decent looking, that explains your product more then  your words.

Yes, you need a professional photo box / a light box /  or a photo studio kit.

Tutorial, DIY, Flower Earrings, Light -box, Photo-box, step by step, how to, simple , easy, cheap idea, photography, jewelry photo

Most of the people has budget problem, and its a pretty obvious that many would not prefer to spend hundreds of dollars for those fancy kits.

To solve this problem I have found my own way, and after seeing above picture , my "Cherry blossom Zumka earrings" you will be surprised that I was able to take such a good picture without spending any extra penny!!

I have seen many light-box tutorial videos, indeed they are cheaper then Fancy kits, and has good functionality. But to make them you need a cardboard box, white- fabric / t-shirt and three external lamps.. 

But In my version of photo-box I have cut down cost of white fabric / t-shirt and external lamps..

I made my photo-box with recycle box, parchment paper from my kitchen, scotch tape.
And for back-ground I used regular printer paper. 

Tutorial, DIY, Flower Earrings, Light -box, Photo-box, step by step, how to, simple , easy, cheap idea, photography, jewelry photo

My version of light-box works best in day-light so don't need any external / extra lights.
So the final cost comes to Zero. A very useful product made with regular household things.

I have made video that explains all the steps how to make this photo-box.


Hope this tutorial will help you to take good pictures of your jewelry and other product. 
If you have any comments or questions please feel free to write in the comment box.

Have a great day!!!

Thursday, February 20, 2014

Tutorial - Flower hair clip

I started working with clay in 2009-2010, and the first thing I made was flowers.
I still have the first flower I made, and its very special to me.
Today when I see it I smile and feel good, that how nicely I am handling clay, creating things in a way I have imagined. 
Sharing Image of my first flowers.
No one never teach me how to work with clay, its just practice, practice, practice.
and I created beautiful petals in my own way.
Its been a long time I shared this tutorial on my Facebook page.
Now I am posting regularly my bog, sharing it here with my readers as-well. 

The Flower hair clip Tutorial / DIY

A beautiful flower clip I made for my niece for her First Birthday
Sharing my 9 east steps to create a beautiful clip. Make it for you or as a beautiful gift so someone.

***Get ready with the material list.***
-Polymer clay in for favorite color
-Wooden tooth pic
-Small scissors
-Hair clip
-Permanent Glue

Lets Begin .....

Step 1 : Take a small amount of Clay, and roll it like a ball. it don't need to be a perfect round.


Step 2 - Now shape it like a water drop/ tear drop


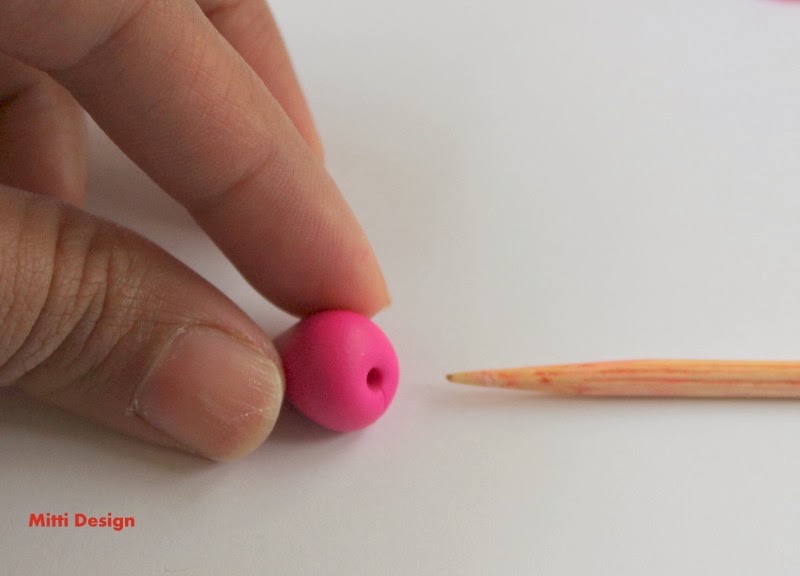
Step 3 - Take toothpick and make a small hole in center


Step 4 - Now fun part - cut equal parts with your scissors - they will be your petals.
For beginning you can start with four, I am making six.


Step 5 - Take toothpick and genteelly try to expand that petal.. 
***Handle with care, and no much pressure.


Step 6 - And just like that make all six petals...
 Tada.. you made a flower.. Congratulations!!!!


Step 7 - I have made 3 flowers, and a bud for my hair clip.


Step 8 - Time to arranged them, I choose a silver center for my flowers.. 
I made 3 small balls and stuck them to each flower. Now, made dots on these balls with my toothpick.


Step 9 - Now bake your flowers as per direction on the package of your clay..
And its ready.... I took my hair clip and glue flowers on it. 


So exited to make ??
Do share with me when you make one for you. I'll be happy to see it.

Have Fun!